2021.9.29
VitePressを使ったサイトの作り方
VitePressってそもそも何?
VitePressは、VuePressを改善したものなので、VuePressの説明からしたいと思います。
・VuePress
マークダウン記法でお手軽に静的サイトを作成し、VueコンポーネントやCSSによるカスタマイズなども行えるようにしたもの。
ドキュメント以外にもブログなどに使える。
・VitePress
VuePressで使っていたwebpackと呼ばれるビルドツール部分をVueの作者が作ったViteというものに置きかえたもの。
ES ModulesというJSのネイティブの読み込み方式を使うビルドを行うため、webpackより軽く、軽快な動作になっている。
必要なもの
・Node.js
・VScode
説明に使用しているサンプルはこちらです。
https://taka1156.github.io/vitepress-sample/
手順
1. 新しいディレクトリの作成
mkdir vite-sample && cd vite-sample
2. 初期化
yarn init or npm init
3. vitepressをインストール
yarn add –-dev vitepress or npm install -D vitepress
4. package.jsonに以下のscriptsを記載
{
        "name": "vite-sample",
        "version": "1.0.0",
        "license": "MIT",
+      "scripts": {
+         "docs:dev": "vitepress dev docs",
+         "docs:build": "vitepress build docs && mv docs/.vitepress/dist dist",
+         "docs:serve": "vitepress serve docs"
+      },
        "devDependencies": {
            "vitepress": "^0.16.1"
        }
  }
5. 以下を実行し、初期ファイルを作成(エディターのUIから作成してもOK)
mkdir docs docs/.vitepress
touch docs/.vitepress/config.js
touch docs/index.md
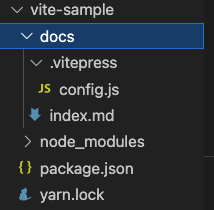
6. 以下のようなディレクトリ構成になっていれば準備完了

| ファイル名 | 用途 |
|---|---|
| config.js | VitePressの設定情報を書き込むファイル。 headやsidebar、navigationの情報もここで記載すると自動で作成される。 |
| index.md | トップページとなるファイル。 他のページとは違い、markdownの先頭に、yaml形式のトップページ専用のデータを挿入することができる。 |
index.mdは以下のような記載ができます。
(他のページのように普通のマークダウン記載もできます)
— — —
home: true
heroText: Welcome to VitePress
tagline: VitePressのサンプルページ
actionText: Get Start
actionLink: /0_docs/
features:
– title: 🟩 機能説明
details: 詳細
– title: 🟦 機能説明
details: 詳細
– title: 🟧 機能説明
details: 詳細
– title: 💻 機能説明
details: 詳細
– title: 🛠 機能説明
details: 詳細
– title: 📍 機能説明
details: 詳細
footer: MIT Licensed | Copyright (c)︎ 2021
— — —

カスタマイズ
このままでは少し扱いづらいので、フォルダをさらに追加します。
1. 以下を実行し、初期ディレクトリを作成(エディターのUIから作成してもOK)
mkdir docs/public docs/constants
mkdir docs/.vitepress/components docs/.vitepress/theme
| ファイル名 | 用途 |
|---|---|
| public | OGPやmarkdown内で使用する画像を置いておく |
| constants | 編集者一覧などまとめて管理したいものを定義するファイルを置いておく |
| components | markdown内で使用したいコンポーネントを置いておく |
publicについてはさらにarticle(blog)、site、writersディレクトリを作成すると管理しやすくなるかもしれません。以下は拡張機能や設定について説明いたします。
config.jsの設定
meta系
module.exports = {
  lang: 'ja',
  title: 'Welcome to VitePress',
  description: 'VitePressのサンプルページ',
  head: [
      [
        'meta',
        { property: 'og:image', content: '/vitepress-sample/site/logo.png' },
      ],
      [
        'link',
        {
            rel: 'icon',
            type: 'image/png',
            href: '/vitepress-sample/site/logo.png',
        },
      ],
  ]
  //...
}
テーマ
module.exports = {
  //...
  themeConfig: {
      repo: 'taka1156/vitepress-sample',
      logo: '/site/logo-min.png', // ナビゲーションに表示される画像
      editLinks: true, // footerにページ編集用リンクをつける
      editLinkText: 'このページをgithubで編集',// 編集用リンクのテキスト
      docsDir: 'docs', // markdownドキュメントが入る場所
      docsBranch: 'master', // 編集リンクの遷移先ブランチ
      // nav, sidebarの定義もこちらですが、長いので別枠記載
  }
  //...
}
ナビゲーション
module.exports = {
  //...
  themeConfig: {
      nav: [
        {
        text: 'NAVI',
        items: [
            { text: '0. はじめに', link: '/0_docs/' },
            { text: '1. デフォルトmarkdown構文', link: '/1_usefulmd/' },
            { text: '2. markdown-it構文', link: '/1_usefulmd/markdownit' },
            { text: '編集者、管理者一覧', link: '/0_docs/writers' },
        ],
        },
        {
        text: '公式リンク',
        items: [
            {
              text: 'VitePress',
              link: 'https://vitepress.vuejs.org'
            },
            {
              text: 'Vite',
              link: 'https://vitejs.dev/'
            },
            {
              text: 'Vue',
              link: 'https://v3.ja.vuejs.org/'
            },
            {
              text: 'github pages',
              link: 'https://docs.github.com/ja/pages/getting-started-with-github-pages/about-github-pages'
            },
        ],
        },
        {
        text: 'コミュニティ',
        items: [
            {
              text: 'vuejs-jp',
              link: 'https://vuejs-jp.org/'
            },
        ],
        },
      ]
  }
  //...
}
サイドバー
module.exports = {
  //...
  themeConfig: {
      '/': [
        { text: '0. はじめに', link: '/0_docs/' },
        { text: '1. デフォルトmarkdown構文', link: '/1_usefulmd/' },
        { text: '2. markdown-it構文', link: '/1_usefulmd/markdownit' },
        { text: '編集者、管理者一覧', link: '/0_docs/writers' },
      ]
  }
  //...
}
markdown構文の拡張
内部のmarkdown処理には、markdown-itが使われているため、その周辺モジュールであれば、大抵のものは使えると思います。
今回は例として、markdown-it-containerを使用します。
1. docs/.vitepress/plugins/md/index.jsを作成し、下記を記載
const containerMdExtend = (md) => ({
validate: function (params) {
return params.trim().match(/^spoiler\s+(.*)$/);
},
render: function (tokens, idx) {
var m = tokens[idx].info.trim().match(/^spoiler\s+(.*)$/);
if (tokens[idx].nesting === 1) {
// opening tag
return '<details><summary>' + md.utils.escapeHtml(m[1]) + '</summary>\n';
} else {
// closing tag
return '</details>\n';
}
},
});


module.exports = containerMdExtend;
2. config.jsに以下を記載
const containerMdExtend = require('./plugins/md/index.js');

module.exports = {
  //...
  markdown: {
      lineNumbers: true,
      config: (md) => {
        md.use(
            require('markdown-it-container'),
            'spoiler',
            containerMdExtend(md)
        );
      },
  }
}
3. markdown内で以下の構文が使えたら成功です。
::: spoiler アコーディオン見出し
隠したいテキスト
:::
vueコンポーネントの埋め込み
サンプルとして編集者一覧を表示するコンポーネントを作成します。
1. docs/.vitepress/components/WitersBox.vueを作成し、下記を記載
<script setup>

   import { withBase } from 'vitepress';
  import { WRITERS } from '../../constants/index.js';

  const writers = WRITERS;

</script>

<template>
  <div>
      <div v-for="(writer, i) in writers" :key="i" class="writers-box">
        <p>{{ writer.writerName }}</p>
        <div class="profile-box">
        <img
            :src="withBase(writer.imgIcon)"
            alt="プロフィール画像"
            class="profile-box__img"
        />
        <div class="sns-icons">
            <a :href="writer.github" class="sns-icons__icon">
              <img src="/site/github.png" alt="github" />
            </a>
            <a :href="writer.twitter" class="sns-icons__icon">
              <img src="/site/twitter.png" alt="twitter" />
            </a>
        </div>
        </div>
      </div>
  </div>
  </template>

  <style scoped>
  .profile-box {
      display: flex;
      justify-content: center;
      width: 90%;
      height: 150px;
      padding: 0;
      margin: 0 auto;
      margin-left: 0;
      border: 0.5px solid gray;
      border-radius: 5px;
  }

  .profile-box__img {
      display: block;
      width: 30%;
      height: 80%;
      padding: 0;
      margin: auto;
  }

  .sns-icons {
      display: flex;
      justify-content: space-around;
      align-items: center;
      width: 65%;
      padding: 10px auto;
      border-left: 1px solid gray;
  }

  .sns-icons__icon {
      height: 50px;
      width: 50px;
  }

  @media screen and (min-width: 768px) {
      .profile-box {
        width: 60%;
      }
      .profile-box__img {
        width: 30%;
      }
  }
  </style>
2. docs/constants/index.jsを作成し、下記を記載
const WRITERS = [
      {
        writerName: 'taka1156',
        imgIcon: '/writers/taka1156.png',
        github: 'https://github.com/taka1156',
        twitter: 'https://twitter.com/taka_1156',
      },
      {
        writerName: 'coming soon...',
        imgIcon: '/writers/noimg.png',
        github: '#',
        twitter: '#',
      },
      {
        writerName: 'coming soon...',
        imgIcon: '/writers/noimg.png',
        github: '#',
        twitter: '#',
      },
      {
        writerName: 'coming soon...',
        imgIcon: '/writers/noimg.png',
        github: '#',
        twitter: '#',
      },
  ];

  export { WRITERS };
3. docs/.vitepress/theme/index.jsに下記を記載
import ThemeDefault from 'vitepress/dist/client/theme-default';
import WritersBox from '../components/WritersBox.vue';


export default {
  ...ThemeDefault,
    enhanceApp({ app }) {
      app.component('writers-box', WritersBox);
    }
};
4. このような表示ができたら成功
# 編集者、管理者一覧
**Thank you for your cooperation**
<writers-box />

デプロイ(github actions)
github actionsを利用して、自動デプロイを行ってみましょう。
1. ワークフローを格納するディレクトリを作成する
mkdir .github .github/workflows
2. yarmlを作成
touch .github/workflows/main.yaml
3. yarmlの中身を以下のようにする
 name: gh-page deploy

  # masterにpushした時
    on:
    push:
        branches:
        - master


    # 動かす環境や走らせて欲しいコマンドなど
    jobs:
    build-deploy:
      runs-on: ubuntu-18.04
        steps:
        - uses: actions/checkout@v2
        - name: setup node
          uses: actions/setup-node@v1
          with:
            node-version: '14.x'


        - name: Cache dependencies
          uses: actions/cache@v2
          with:
            path: ~/.cache/yarn
            key: ${{ runner.os }}-node-${{ hashFiles('**/yarn.lock') }}
            restore-keys: |
                ${{ runner.os }}-node-


        - name: install
          if: steps.cache.outputs.cache-hit != 'true'
          run: yarn install


        - name: build
          run: yarn docs:build


        - name: deploy
          uses: peaceiris/actions-gh-pages@v3
          with:
            github_token: ${{ secrets.GITHUB_TOKEN }}
            publish_dir: ./dist
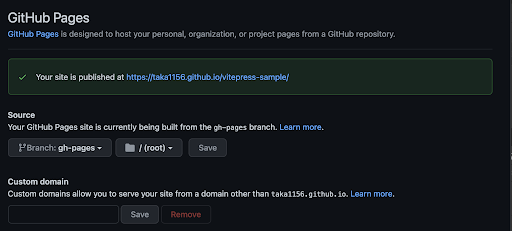
4. github pagesの設定画面(Settings > pages)を開き、gh-pagesブランチを指定して公開。
以降は、masterにpushされるたびに自動でビルドが走ってホスティングされます。

以降はこちらを頼りに執筆をおこなってみてください。
この記事を書いた人
匿名
Vue周りの技術が好きでNuxtはもちろん、ElectronやIonicの組み合わせなど色々試しています。
最近は、Nuxt3のリリースが近いのでdocusなど新機能について調べてます。


